
 Counted Cross Stitch put Simply |
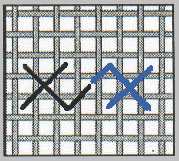
| Each square on the charted design is a stitch on the fabric and each symbol is a different colour of floss. Bring your needle up and stitch down diagonally across, then complete the "X" by stitching diagonally across the first stitch. |
 |
More detailed instructions are listed below
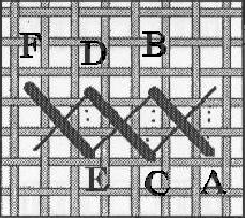
| All instructions below are as if you were stitching on either linen or evenweave fabrics. There will always be 2 vertical and 2 horizontal fabric threads running through your cross stitch. This is referred to as stitching over two fabric threads. If stitching on | Aida (as shown in the above diagram) then you would stitch into every hole. Imagine the line intersections on the pattern corresponding to the holes on the Aida cloth. |
The American and the European methods.
The American Technique
|
With this method you will first complete the bottom half of each cross-stitch in the row you are stitching and then complete the top half of each cross stitch on the "return trip". On the reverse side of the fabric there will be a row of vertical lines. This technique works well with the "stab and poke" method using a working frame, either a Q-Snap or scroll frame. The American Method is the preferred technique by the majority of cross-stitch contest/fairs in the United States. Traditionally one cross stitches from left to right, yet to stitch according to the American method (i.e., straight vertical lines on the back) the stitch is worked differently depending on whether you are working from left to right, or from right to left. |
These various stitching directions exist, because you want to stitch up an unoccupied hole, and stitch down an already stitched through one. This is not to say that it should never happen otherwise, just that it is a cleaner stitch when you stitch down into an occupied hole. Important to remember: No matter in which direction you are traveling the top stitch of your cross must always lie in the same direction. |
|
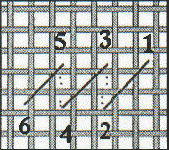
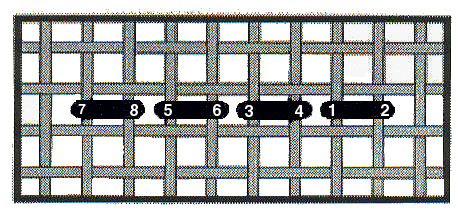
From Left to Right This stitching direction is ideal when the row you are stitching is below those stitches already completed. As you can see on the diagrams below, by stitching up at 1 you will be stitching through an unoccupied hole and by stitching down at 2 you will stitch into an occupied one. Travel from left to right in the numerical sequence as shown. This will complete your "first" trip. For your "return" trip travel right to left. On the diagram below these stitches are shown thicker. |
  |
|
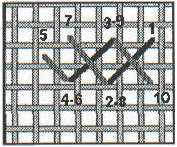
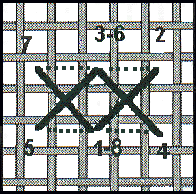
From Right to Left This direction is not as prevalent as the one above, as most of us complete a design from the top to the bottom. In case you encounter working up row by row, then stitch from right to left. Again this is to avoid stitching up through a hole occupied by a stitch in the row below. Travel from right to left in the numerical sequence as shown. This will complete your "first" trip. For your "return" trip travel left to right. On the diagram below these stitches are shown thicker. |
  |
  |
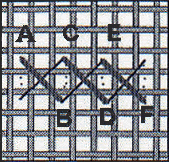
Quarter Stitches To produce nice curves and finer detail, designers will incorporate quarter stitches, three quarter stitches and backstitching. The 1/4 stitch is made with a half diagonal. When stitching on linen the 1/4 stitch will be stitched from one of the four corners into the middle hole. When stitching on aida then you must force a hole into the center of the cross stitch. If the design has too many 1/4 stitches it will be easier to stitch on linen or an evenweave. Two colours in one square On the chart the square will be divided diagonally into two with a different symbol or colour on either side. On your fabric the two different thread colours will share the center square and the backstitch will then follow the diagonal dividing line. |
|
Positioning the Quarter Stitch 1) If the backstitch divides the square from top left to bottom right as in this square 2) If the backstitch divides the square from the top right to the bottom left as shown If the dividing line of the symbol square on the chart is a backstitch then each diagonal stitch is called a 1/4 stitch. If however, the stitching instructions tell you to stitch the dividing line in the same colour as one of the 1/4 stitches then this stitch is called a 3/4 stitch. |
Backstitching The backstitch is used to outline cross stitches, to make straight lines and form letters. Backstitches should be done after all the cross stitches are completed. To outline cross stitches, backstitching is generally done in a darker shade of thread and fewer number of threads. For example, if you cross stitch with 2 strands of floss then the backstitch will be done with 1 strand. The first stitch is made by coming up at 1 and stitching down at 2. The next stitch is formed by coming up at 3 and stitching down at 4 (sharing the hole with 1). All of the next stitches follow in the same manner, stitching ahead of the next stitch (up in an unoccupied hole) and then stitching back into the same hole of the previous stitch. |
The European Technique
|
Also known as the Danish counted thread technique, it is worked without a working frame and uses a sewing method rather than the "stab and poke" method described above. The fabric is held in the left hand (assuming you are a right-handed stitcher) stretched over the index finger and held down with the middle finger and thumb. Stitch up at one and as you stitch the needle down at 2 you would then bring it up at 3. Stitch down at 4 and carry the needle over and up at 5 to begin your next stitch. Using this method you stitch from the right to the left and work one complete cross stitch at a time. When backstitching using this technique, follow the same sequence as that given above, just complete it with the sewing method. |
 |
|
Stitching Tips 1) The top stitch (return trip) must always be in the same direction. 2) Never knot your starting and ending threads in the back. Weave the thread tails through approx. 5 stitches and then clip the thread. 3) In the back of your work avoid carrying your thread a great distance from one area to the next. This is especially true if the traveling thread is darker than the stitches you are passing the thread over, as you may see the darker thread through to the front of your stitching. 4) Try to maintain an even tension. Using a working frame will help you control your tension. The newest frames on the market for cross stitching are Q-Snaps, they are preferred over hoops. Q-Snaps stretch your fabric in all 4 directions as hoops do, but they are easier to apply and never leave "hoop marks". |
5) Railroading - if you find your threads are constantly twisting, you should let your needle hang down and untwist itself or you can use a technique called "railroading". With your index finger flatten the thread in the direction in which your stitch is to lay, then stab your needle between the 2 strands of floss into your fabric hole. As you pull your thread through the fabric continue holding the thread in place. If you are stitching with multiple threads a laying tool is recommended. This tool is used to control your threads or specialty fibres to ensure they may lay flat and untwisted on the fabric. 6) Lastly, cross stitching is to be enjoyed. If you are uncomfortable with any of the above instructions, please do not feel as if they must be followed. For instance if you find a working frame awkward and prefer stitching without one, please do so. If you are not enjoying your work then your project will probably never be completed. |
Happy Stitching!
| Copyright © Gitta's Charted Petit Point | questions@gittas.com |