 Learning the Stitch: The Continental or Tent Stitch |
|
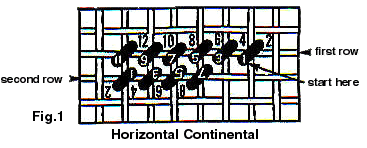
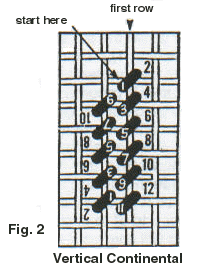
The Continental stitch appears slanted, from the bottom left to top right, over one canvas intersection. It is worked horizontally from right to left or vertically top to bottom. At the end of a row the canvas should be turned upside down to ensure the next row will again be worked right to left (or top to bottom) maintaining a constant tension. When starting a thread, make an away waste knot, then bring your needle up at 1 (see fig.1 for the horizontal stitch & fig.2 for the vertical). Stitch down at the first hole diagonally up and to the right by one canvas thread. As you stitch down at 2 in a continuous motion bring your needle up at 3, the first hole left of 1 for the horizontal stitch, or the first hole below 1 when stitching vertically. Follow the sequence by using this sewing method until your row is complete. When stitching your last |
 stitch in a row/column, simply stitch down at the top of the last stitch (i.e.. #12 of the diagrams). Now turn your canvas upside down to begin your second row/column. Again working right to left/ top to bottom, when bringing your needle up at 1, please note that, this hole will be shared by 9 of the previous row/column. |
|
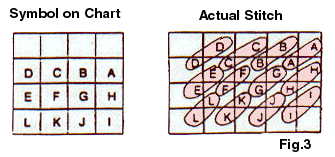
Left Handed Stitchers: Simply put, left-handers follow the above instructions completely opposite to right-handers. You will stitch left to right and bottom to top. Looking at fig.1 and .2, bring your needle up at 12, as you stitch down at 11 stitch up at 10 at the same time. By using the sewing method follow the sequence of numbers in the reverse. Note: Your stitch will appear slanted both on the front and on the back of your work. In order to use the sewing motion, you will be working without a frame. If you prefer stitching with a frame, you will be stabbing up and down, but maintain the correct stitching sequence. Avoid a straight line in back, a slanted stitch looks fuller. Hint: Watch your tension - you do not want your thread to sit loosely above your canvas, yet you also do not want to pull your threads so tight as to distort your canvas grid. Counting: In cross-stitch counting appears straight forward as both the symbol on the chart and your stitch are square. In petit point/ needlepoint a square symbol translates to a diagonal stitch, using only two holes on the canvas. The easiest way to count is to always use the bottom hole of the actual stitch as your marker. Fig.3 shows how the symbols on the chart correspond to the actual stitches on the canvas. Each symbol on the chart corresponds exactly to the bottom hole of each stitch on the canvas. Within each row two stitches will never share the same hole, but the top of a stitch from the row below will share the bottom hole of the stitch above and to the right. |
  |
Canvas / Number of threads chart
| Canvas Stitch Count | Number of Stands | Needle Size |
|
40ct silk gauze 30ct silk gauze 24ct silk gauze or cordova canvas 18ct mono canvas 11ct penelope canvas 10ct penelope canvas |
1 strand cotton floss 2 strands cotton floss 3 strands cotton floss 4 or 5 strands cotton floss 1 strand Anchor tapestry wool 1 strand DMC tapestry wool |
28 26 24 22 20 20 |
Cross-stitch patterns which can be petit pointed:
| There are cross-stitch patterns on the market which can be petit pointed. These designs must be comprised of primarily full stitches and little or no backstitching, as the continental stitch can not be divided in two. In petit point it is the subtle colour changes which define the depth of the design. In cross-stitch it is the backstitching which brings out the designs definition. Such designs are those by Lavender & Lace, Mirabilia, Ross Originals, Down Under British Cottages collection, some Pegasus Originals by Marty Bell, Lanarte, Permin, and designs by John Stubbs from the Heritage Collection. | Hint: Stitch all the full stitches first. If two 1/4 stitches divide one symbol square, you must decide which colour to stitch as a full stitch. If the 1/4 stitch is along the edge of the design, you must decide whether to stitch it as a full stitch or omit it all together. Backstitch as closely to what's indicated on the chart. With regards to beads, if they are scattered you may not have to substitute them. However, if the beads are bunched together either substitute them with petite beads or French knots using a metallic thread depending on the count of the silk gauze. |
| Copyright © Gitta's Charted Petit Point | questions@gittas.com |
